I've made some good progress on the battery cradle for the car - it's almost finished. I put some final touches on it last night, and am pretty happy with how it's turned out. Hopefully I'll be able to do the final fitting tonight, then wire it up and mount it onto the car for good by the end of the week. That's the plan anyway - we'll see how far I get with the wiring, as I'm having trouble sourcing the correct-sized crimp-on terminal lugs that I need.
Anyway, before we get ahead of ourselves, this is how my weekend started.

My high-tech workstation:

Beginners mistake. I knew I should have just welded the sides (easy to cut apart again), but in my excitement in using the welder, I welded the base as well:

My very fashionable welding attire:

The base section is made from 40mm x 40mm angle iron, 3mm thick. it's pretty sturdy.

I was pretty happy with the welds I was laying down. They're not pretty, but they seem to be strong enough. Good enough for a first go, anyway. The quality improved markedly by the end of the fabrication though! Still not what you'd call pretty, but a much nicer weld in much less time.


My little grinder got a big workout all weekend, but handled it like a champ.


The base took a long time to get right. Initially, I cut the short sides too short. So after half a dozen weld-trial fit-cut-weld cycles, I gave up and made some new ones. Only to find then that one of my long sides was mysteriously too short. Cue another few weld-trial-cut-weld goes, until I worked out that I couldn't make it fit, and cut a new long-side to suit. Eventually, it fit perfectly. Nice and snug, but with enough clearance all around.
Next step was to weld on the uprights, and then the wings.

The uprights were all cut to the same length, and positioned very carefully before being welded on. A lot of time was spent with the metal rule and the set-square to ensure that they were the same length, and were as square as I could get. Happily, that work paid off well. Once they were on we could trial fit the whole apparatus up under the car. Heaps of room under there! The initial fittings showed that the base of the carrier would sit a couple of inches higher than the panhard bracket at the front, the spare tyre on the inside, the tow bar at the rear, and the body work of the car on the outside. So it will be pretty well protected up there.
Welds are starting to get better now as I fine tune the machine.


I had given in earlier on Saturday morning and bough a generic Projecta battery tie-down kit, rather than fabricate my own from threaded rod and angle. It was to save me some time, but the kit's pretty flimsy, and will need modification to work well with the battery anyway. So I'll probably end up cutting it apart, and maybe even making my own top brace from scratch if I can't sort out the supplied one. Chatting with Justin on Friday, he noted that if we could weld the threaded rod onto the base section, then we wouldn't need the side wings to bolt through, thus saving material and time. If I was going to do this again, I'd definitely just go with a DIY option. Although the wings do add a fair bit of strength to the assembly - it's pretty bomb-proof.

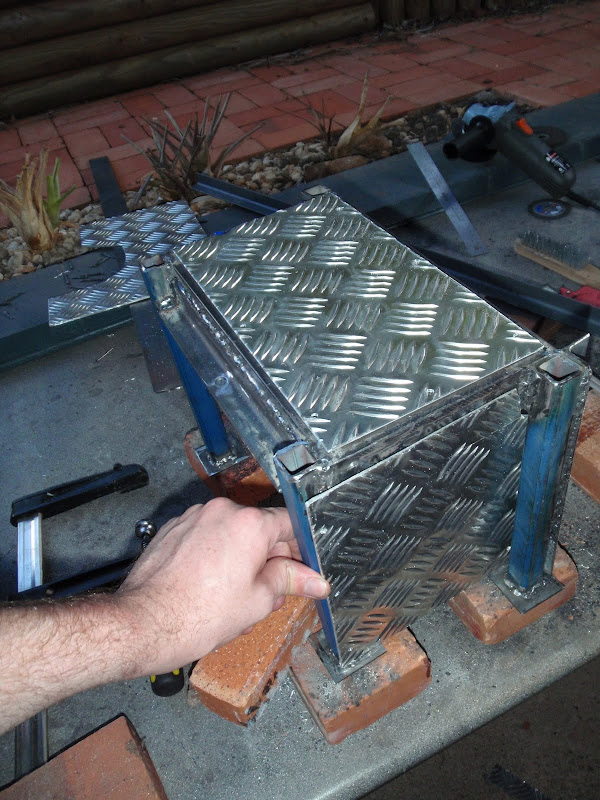
Almost done with the fabrication now. You can see the top plates have been welded onto the uprights. Inside each upright is a captive nut, a 10mm high-tensile (it was all Bunnings had in a 10mm!!! Shouldn't move any time soon) welded inside the upright. On top of that is the 50mmx50mm load-spreading plate, drilled in the centre to accept the bolts that will hold the entire thing onto the car. Tricky to get right, but not really that difficult.
You can also see the flat bar welded across the back - that was a last-minute addition to give us something to attach the Anderson plug to. This way, the battery and it's wiring will be all nicely secured to the holder, and can just connect to the car and the rest of the system via a standard 50A Anderson plug. The 50A breaker will also be mounted onto the cradle, to keep things nice and safe. It's also been the subject of a late change, but will now be sited about an inch from the +ve terminal - just about the perfect spot for it!
Showing the aluminium stone guards in front and underneath the cradle. The design of the front guard (the one I'm holding in place) has since changed, after it was discovered last night that it was simply too thick to pass behind the upright (the one opposite my hand) and still give enough clearance to get the battery in. It's now been bent 90-degrees, and mounted to the front of the upright, instead of behind it.
The guards are made out of the same 2mm ali checkerplate that I used to fab up the front control board. I figured if I used steel, then I'd be forever repainting it from the stone chips and scratches. With the ali, it can get as beat up as you like, and it won't rust. The plates have been pop-rivited on, for easy removal and replacement down the track if necessary. 2mm checkerplate should be more than tough enough.
Time for the scary bit:

We made a template from cardboard of the top of the holder, cutting around the top mount plates. Ensuring that it stayed the right orientation, we then taped it underneath the car where we wanted it. From there, it was an easy but nervewracking job to drill up from underneath with the 10mm drill bit, and chew 4 big holes out of the car. I'm happy to say though that when we trial-fitted it together, it mated up perfectly, and bolted to the car just like a bought one.
Lesson learnt - protective eyewear is worth it's weight in gold, but it doesn't stop re-hot pieces of swarf from landing on your cheek or down your shirt when you're working above your head. And it's hard to shimmy out from under a car when holding a drill and swearing profusely.

A quick spray of Cold Gal stopped the holes from rusting. Of course, it's been raining here yesterday and today, and I've been driving around in a car with no rear inner guard, and 4 great big holes drilled in the boot - perfect timing!!!
The carrier was then stripped, cleaned, and given half a dozen coats of cold gal.

This should provide a more durable finish than painting, and be easier to touch up. I thought about using a heavy-duty chassis black, but figured the cold gal was just as good. Plus, it was right on the shelf in front of me, and that counts for a lot in my book.
That's how it finished Sunday night. Last night I cut the rubber to size, pop-rivited the ali guards on, and tried fitting the battery in to it. Immediately we hit problems. As mentioned, the battery wouldn't fit between the wider uprights with the stone guard in it's original place. So that was no good. The plan was to have things snug, but not touching/rubbing. So I modified the front guard to what I should have done all along, and put a 90-degree bend in the ali sheet and mounted it to the outside of the upright. Of course, I got the location of the bend wrong, and it bent it too early, so needed to try and bash the sheet flat again and re-bend in the right spot - the punishment for getting cranky and rushing things. It's now an artistic S-shape, but seems to be no worse for the experience, plus it fits.
The battery fits in perfectly, and the rubber matting provides a nice cushion under as well as strips down the sides. We then found problems with the original location of the 50A breaker, and needed to relocate it, which meant removing the battery and drilling more holes. Fortunately, it's now in an even better position, so it worked out well.
We finished last night by touching up some of the cold gal where we'd drilled new holes, and riveted the ali guards on in their final spot. I need to trim the freshly bent guard a bit, but will do that tonight in-situ with a hacksaw. I did take pictures of last night's work, but clean forgot to download them from the camera - I blame Top Gear.
Jobs yet to be done on the carrier:
- Modify the top tie-down so that it actually stands a chance of holding the battery down
- Mount the 50A breaker and Anderson plug to the carrier
- Wire up the carrier - +ve -> 50A breaker -> Anderson plug, -ve -> Anderson plug
- Mount the battery in the carrier for the final time
- Source/make load-spreading washers to go inside the car under the main bolts
- Mount the carrier and battery assembly onto the car
- Modify the inner guard lining for clearance - might just need a little trim to make everything fit nicely.
Jobs yet to be done on the whole system:
- Wire up the front panel - still trying to source the right size terminal lugs
- Wire and mount the front Anderson plug
- Run the main wiring from the engine bay to the back corner of the car
- Wire up the rear of the car - connection to the battery carrier, connection to the front wire run, connection to the rear Anderson plug, connection to the rear panel
- Make the rear panel, trim it, wire it up, and mount it
Still a lot to go, but most of the really tricky things have now been done. The remainder of the job will be time consuming to ensure it's right, but it will be pretty straightforward. I'll get some more photos of the carrier tonight!

No comments:
Post a Comment