
This is a work in progress so far, but I thought I'd throw up what I've done up to now.
When we were over on Moreton Island at Christmas time, our trusty old solar shower bag sprung a leak. Also, the weight of hanging 20kg bags of water from the top spars of our shower tent took it's toll and broke one of the fibreglass spars. Not to mention that we had to lash the shower tent to our main tent to stop it falling over with so much weight up top - ask me how I know what it was about to do!
But generally, the lack of pressurised water sucked big time. The solar shower had always done us proud, and in the outback even a dribble of water over you washes the dust off and you instantly feel a million bucks. But the sand needed more pressure to get it off you - the dribbling water stream from the bag simply made it stick to you more. So I cracked it with the solar shower, and vowed I'd get something better.
When you're looking at your options when it comes to camp showers, there's a LOT of very different solutions out there, ranging from the fancy to the basic, and from the cheap to the expensive. You've also got to weigh up the size and weight of the various options - if it's too big or cumbersome, you're not going to take it with you. and if it's too hard to set up or takes to long to get going, you're not going to want to use it.
We settled on a heat-exchanger style setup. There are a number of companies who make kits in this style, and they're all pretty similar. You have a 12v water pump to draw water out of a bucket/creek, and pump it through a heat exchanger. It comes out the other end hot, and you plug in your shower rose, and instant hot shower. The heat-exchange is plumbed into the vehicle's cooling system, so running the engine gives an unlimited supply of hot water for showering, or washing up, or whatever you need hot water for. Keeping in mind that the vehicle's cooling system will normally run at around 110-degrees, you can end up with quite hot water (which can catch you out if you're not careful!).
These systems have their downsides - you've got to shower near the car, and you've got to have the car running to get hot water. But they're very compact, since everything mounts under the bonnet, all you've got to take with you is the pick-up hose and the shower hose/rose. And that sounds perfect to me. They're also very simple - no complex, fancy stuff to go wrong. And they're ready to use as soon as you are - no boiling water / forgetting to leave the solar shower bag in the sun, etc.
I had decided to use a
Glind unit as they're a local QLD based company, and others have had very good experience with them. There are other options that are very similar -
Twine is another Aus-based company that's been doing this for a while, Piranha have their Power Shower setup, and there's a mob called Helton that make heat exchangers in different shapes and sizes, and you supply whatever pump you want. The Glind units seemed ever so slightly better built (6 bolts holding the centre together, instead of 4 on the others for instance), the pumps that were included were a bit better, and their service and response to emails was good. So I was pretty sold on the Glind unit.
The only problem was that, being who I am, I didn't really want to spend $500 on the Original kit that included the big FloJet pump. It's listed as being able to draw water from a creek 10m away and up a 2m incline, and give really good pressure. I figured that pretty much every time I'd be using it, I'd be drawing from a bucket/jerry at the car, and thus could get away with the smaller pump. The pressure and flow rate might not have been as good, but it would be easier to mount under the bonnet. Another tick in the Glind's favour is that the smaller pump (the Little Ripper kit) is a fully marinised pump as well - meaning it's salt-water safe - important if you ever need to draw from a very salty bore, for instance. I found a lot of the others, with their smaller pumps, were not marine pumps.
So that was saving some money right there - the RRP on the Original kit is $500, the Little Ripper, $430. Then I happened to chance across an eBay seller in Bris, reselling the Glind kits at a discount. So I bought a Little Ripper kit from him, for the princely sum of $355. Wonderful - that was much more in my price range, and would do everything we wanted. Maybe not as fancy as the big kit, but that was OK. The next day I received the dreaded email from the seller advising me that Glind were out of stock of the smaller Little Ripper pumps. Rats - knew it was too good to be true. However, the factory was offering to upgrade me to the bigger Original kit for no extra charge!
Awesome! Every now and then you kick a goal!
2 days later, the big box arrived at home:

How all of that fitted in that box, I'll never know. I certainly haven't been able to pack it all back away.
Of course, the downside to this was that instead of easily being able to fit the smaller pump under the bonnet, I had to squeeze in the big pump. A fellow on the Pathfinder forum had emailed me photos of his install. He had his pump (the bigger one too) mounted vertically, behind the grill and in front of the radiator. Initially I was going to put mine in the same spot, but the manual that came with the pump was
*very* insistent that the pump was not sealed and should be kept away from water. It was also quite clear that the pump shouldn't be mounted motor-down. Now, obviously this other fellow has not had any problems with his set up, and he covers MANY more outback miles that I probably ever will. So I really don't think it matters. But I'd already had a spot picked out for the smaller pump, so I thought I'd see if the bigger one would fit.
An afternoon playing around with cardboard and a pair of scissors produced a workable template, which was easily cut out of some left over aluminium treadplate and bent up.

Pretty, it ain't. In a lot of spots, what looks like me not being able to cut a straight line is actually sections that have been clearanced from the plate to allow it to squeeze in...

...there, using existing bolt locations and without needing to move any of the existing equipment. It's a tight fit...
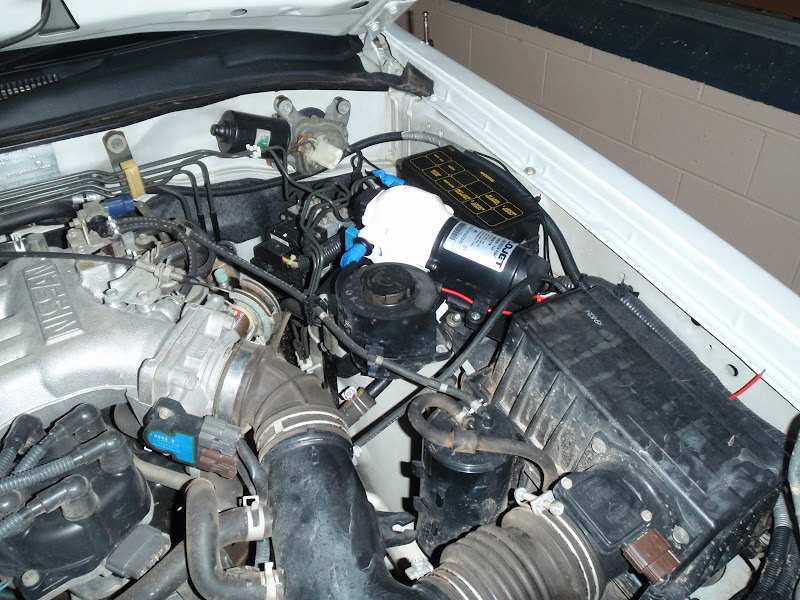
... as well as not having much headroom. Luckily, the angle that it's on mounts the highest part of the pump head inboard of the raised section of the bonnet. Whilst it touches the sound deadening under-bonnet lining (some paint dabbed on the pump head shows exactly where), it actually just squishes the lining a little bit, and still has heaps of room around it. Very happy with how it's turned out. It should be kept nice and dry up there, well away from any water, mud or muck.
We wired in a switch for the pump...

... right next to it, where it's protected nicely in the relay box. Our car is missing the left-most two relays on the top row, which provided a perfect spot for the switch and wiring. The switch has a little green LED on it to show when it's on. It's been wired back to the front control panel of the dual-battery system, and connected through a fuse box to the AUX battery feed.
A few days mucking around with the welder yielded:


A brace of 3 brackets, to hold the heat exchange nice and securely. The last two brackets took all weekend just in themselves - there's no way I could do this as a career - 3 days of fiddling x even a piddly hourly rate would bankrupt anyone!
The end result:

The heat exchanger is all mounted up and ready to go. It's held very securely - the left hand side is rock solid, with only a bit of flex capable on the right-hand side (with the single bracket). I'm hopeful that once the hoses are all connected it won't be a problem at all. It clears all pre-existing equipment, brake lines, vacuum lines and such, and still provides access to the transmission dipstick behind it.
For now, that's as far as I've got, with the heat exchange being fitted to the car tonight. Later in the week I'll need to plumb the HE into the car's heater/cooling system, and bleed any air out of the system and top the radiator/overflow tank. Half an hour spent scrounging through the heater hose bin at Supercheap (and generally making a pest of myself to anyone wanting to get down that isle) netted a pair of VB commodore hoses, which are the perfect shape and length, having a right-angle bend just near one end of them. Unfortunately they're ever-so-slightly too big, but I'm hopeful that with a pair of clamps holding them fast, they'll be perfect.
Once that's done, I need to hook up the shower lines. I need to source a different fitting for the pump - I need a second 90-degree outlet fitting to make things neat. Hopefully I can find a caravan accessory shop in town somewhere, as I think they'd be my best bet. I'm also going to drop into EnZed or Pirtek to have a chat about the fittings that I need - I want to be able to mount quick-connect fittings under the bonnet somehow to make setting up and packing up nice and quick, but don't know what my options are. So I'll speak to the experts, and see what they suggest.
So far I'm pretty happy with how it's coming along. We'll be testing it out at Easter, so it's got to be done by then! I'm hoping to have the coolant system hooked up this week, so we can run it around town for a couple of weeks and prove that there's no leaks or other issues.
Can't wait!


